
Showing posts with label scenery. Show all posts
Showing posts with label scenery. Show all posts
Saturday, April 27, 2013
Lamp-posts painted
Just a quick update - a quick bit of painting this morning has done the job. Empire of the Dead figure for scale...


Wednesday, April 24, 2013
No Salute posts here
No Salute posts here - just lamp posts; mostly because I'm all Salute-ed out. I also do the Warlords blog, so you can find things there if you want.
Anyway; I have made a mould, cast a few test bases and started to assemble the lamp-posts. As suggested before, I will try to pretty up the bases a little - one here has a plastic Renedra barrel on.

I think I need to change resin; this one is very hard. It's also a 10:1 ratio mix, which makes producing small volumes of stuff a bit of a lottery; 1:1 ratio is so much more forgiving.
Anyway; I have made a mould, cast a few test bases and started to assemble the lamp-posts. As suggested before, I will try to pretty up the bases a little - one here has a plastic Renedra barrel on.

I think I need to change resin; this one is very hard. It's also a 10:1 ratio mix, which makes producing small volumes of stuff a bit of a lottery; 1:1 ratio is so much more forgiving.
Saturday, April 13, 2013
Victorian Lamp-posts
I picked up a bag of model railway lamp-posts on Ebay from a buyer called 'we_honest'. It turned out, he was. Anyway, I got a box of fifty posts for £13 including postage, which I thought was pretty good, and they turned up last week.

How to base them? Well, I have a few plastic 30mm bases which I have tried to texture myself. I'm not 100% happy with them, and I think I'm going to actually buy the bases for my Empire of the Dead figures as they arrive, but they're good enough for scenery.
 I'm going to make a mould and cast a load of them; I might drop a penny into the resin while they set to give them some weight and keep them balanced.

I don't have any VSF painted yet, but this pirate gives you an idea of the height - they are 60mm, though you can get 70mm if you feel it's a bit short - personally I'm quite happy with them.

How to base them? Well, I have a few plastic 30mm bases which I have tried to texture myself. I'm not 100% happy with them, and I think I'm going to actually buy the bases for my Empire of the Dead figures as they arrive, but they're good enough for scenery.


I don't have any VSF painted yet, but this pirate gives you an idea of the height - they are 60mm, though you can get 70mm if you feel it's a bit short - personally I'm quite happy with them.
Friday, December 07, 2012
Deep Strike Land Raider - part 2
Earlier this week I took a tenon saw to an eBay Land Raider... here are the results. I think it's an unusual piece of terrain, and I'll enjoy popping it on the table down at the club...


Wednesday, December 05, 2012
Deep Strike Land Raider
I managed to pick up a couple of Land Raiders very cheaply on Ebay. One will be finding itself refurbished properly and added into my Imperial Guard army as an allied unit (I have started writing the fluff for that one), the other one is being turned into terrain.
Stage 1 - close assault on a Land Raider with a tenon saw. As you will see, it's basically a hulk; most of the weapons and hatches are missing and I'll replace some from the bits box.

Stage 2 - the bases are cut from 6mm MDF, the Land Raider parts are stuck down with plenty of hot glue. The larger part will be painted as a Blood Angel vehicle, so I'll do the basing in standard grass colours. The smaller part will go into my Mars terrain so I will probably paint it up in Ultramarine colours to clash with the red basing.

Stage 3 - hatches replaced, weaponry replaced, I will add some torn-away wiring to the right sponson where I'm not going to put a new gun in place but basically I can sand the base and start painting once it's all dried.

Stage 1 - close assault on a Land Raider with a tenon saw. As you will see, it's basically a hulk; most of the weapons and hatches are missing and I'll replace some from the bits box.

Stage 2 - the bases are cut from 6mm MDF, the Land Raider parts are stuck down with plenty of hot glue. The larger part will be painted as a Blood Angel vehicle, so I'll do the basing in standard grass colours. The smaller part will go into my Mars terrain so I will probably paint it up in Ultramarine colours to clash with the red basing.

Stage 3 - hatches replaced, weaponry replaced, I will add some torn-away wiring to the right sponson where I'm not going to put a new gun in place but basically I can sand the base and start painting once it's all dried.

Sunday, June 03, 2012
Cheap chain
I'm always on the lookout for useful bits and pieces for my models. Yesterday I ended up in Primark, and amongst their jewellery I found this piece for £4...


It had three dangly bits - I have disassembled one already - each with ten 3½ inch long lengths of 15 link-per-inch chain. The chain is fairly soft and thin, so it's very easy to combine a couple of lengths if you need to; I joined them up into two- and three-section lengths with a pair of needle-nose pliers. 35" per tassle, three tassles - by my reckoning, that's almost 9 feet of fine chain for under 50p per foot... bargain.
Thursday, January 26, 2012
Clockwork planets (3)
I have finally grabbed the time to do some more on this set of scenery. I now have two hills, half a dozen barricades, a set of pipes and a watch-tower.


The pipes were just narrow drainpipe sections with a bit of grating in the front; the watchtower was more grating and K'nex. All very quick and simple. I will be making some LOS blocking scenery at some point, but I need to come up with some ideas...


The pipes were just narrow drainpipe sections with a bit of grating in the front; the watchtower was more grating and K'nex. All very quick and simple. I will be making some LOS blocking scenery at some point, but I need to come up with some ideas...
Thursday, November 24, 2011
More clockwork planets
I have finished off the first hill, built the barricades, and made a start on the second hill. I have dropped the idea of a metal planet; I couldn't make it look right, and fell back on the 'red martian soil' concept. And it gives a contrast with the dark metal, which is also good.

Building the second hill is easier, since I now know that I don't need holes in the base board for the pegs; the lowest cog is tall enough to make a sturdy foundation for the platforms. I simply pushed all the components together, checked for alignment and height with a couple of figures, and
then epoxied the bottom of each cog to the board. The axles slip in easily enough, so I will paint the parts separately, clip the axles to length and assemble afterwards.

Next step will be to rifle the local charity shops for a set of plastic Meccano to make some buildings from...

Building the second hill is easier, since I now know that I don't need holes in the base board for the pegs; the lowest cog is tall enough to make a sturdy foundation for the platforms. I simply pushed all the components together, checked for alignment and height with a couple of figures, and
then epoxied the bottom of each cog to the board. The axles slip in easily enough, so I will paint the parts separately, clip the axles to length and assemble afterwards.

Next step will be to rifle the local charity shops for a set of plastic Meccano to make some buildings from...
Sunday, November 20, 2011
Clockwork planets (2)
Yesterday's K'nex with some paint on... spray black, drybrush gunmetal and brass. That's a space marine for scale. I am hoping to get time to make another hill this week.

I have ideas for how to make barriers and barricades, too... half a dozen of these based on 3mm MDF.


I have ideas for how to make barriers and barricades, too... half a dozen of these based on 3mm MDF.

Saturday, November 19, 2011
Clockwork planets
Why do all my 40k games get played on a planet that either looks like a Surrey golfcourse or like Stalingrad?
Here's something different - a clockwork hill for a clockwork planet...


K'nex from Ebay, plastic grating from the hobby shop, all mounted on 6mm MDF. I need to go buy another can of spray black primer and I can get some colour on it as well. Dead easy. The lower cogs are about an inch off the board, the higher one is about 2 inches up. The yellow wheels are about 5 inches diameter...
Here's something different - a clockwork hill for a clockwork planet...


K'nex from Ebay, plastic grating from the hobby shop, all mounted on 6mm MDF. I need to go buy another can of spray black primer and I can get some colour on it as well. Dead easy. The lower cogs are about an inch off the board, the higher one is about 2 inches up. The yellow wheels are about 5 inches diameter...
Friday, September 30, 2011
Wooden buildings
I have just spent half the morning de-stressing myself... and I feel so much better now.
This was knocked together from 2'x1' of 6mm MDF and a few scraps of thinner stuff for the floors. The base is a 1'x1' square, the walls are cut from the other square foot. It stands just over 9" high, with floors at 3" and 6". All the windows were cut out with a jigsaw on the workmate.


Once all the glue has dried, I will tile the floors, add a bit of demolition wreckage to the ground, and spray grey. Easy, sturdy, usable.
And I feel relaxed for the weekend...
This was knocked together from 2'x1' of 6mm MDF and a few scraps of thinner stuff for the floors. The base is a 1'x1' square, the walls are cut from the other square foot. It stands just over 9" high, with floors at 3" and 6". All the windows were cut out with a jigsaw on the workmate.


Once all the glue has dried, I will tile the floors, add a bit of demolition wreckage to the ground, and spray grey. Easy, sturdy, usable.
And I feel relaxed for the weekend...
Tuesday, May 24, 2011
Trees
So I have gotten myself started on a nice box of 'countryside' terrain now. First up are the woods; I cut 60mm rounds from 3mm thick cork tiles and then glued them to 3mm MDF board. Cut to shape with a jigsaw, a coat of sand, a sealing coat of PVA glue, then household paint and flock. The trees are glued in singles and small groups onto 60mm diameter bases made from 2mm MDF (cheap on Ebay)


And there we are. The trees are good and stable, the area terrain is cleanly defined, and they come off easily for storage. The next piece will be a minefield (difficult and dangerous, offering no cover in 40k terms) made from more 3mm MDF and cork tiles, using half press-studs as mines.


And there we are. The trees are good and stable, the area terrain is cleanly defined, and they come off easily for storage. The next piece will be a minefield (difficult and dangerous, offering no cover in 40k terms) made from more 3mm MDF and cork tiles, using half press-studs as mines.
Monday, May 16, 2011
Slow progress
I have finished painting the Space Wolf transport, and got the first bits of colour onto the shop...


I'm particularly pleased with the las/plas turrets for the Razorbacks - I will put together a set of pictures to show how to make them, as they're really easy and rather effective in the game.


I'm particularly pleased with the las/plas turrets for the Razorbacks - I will put together a set of pictures to show how to make them, as they're really easy and rather effective in the game.
Wednesday, May 04, 2011
Scenery for 1950s America / Fallout type skirmish game
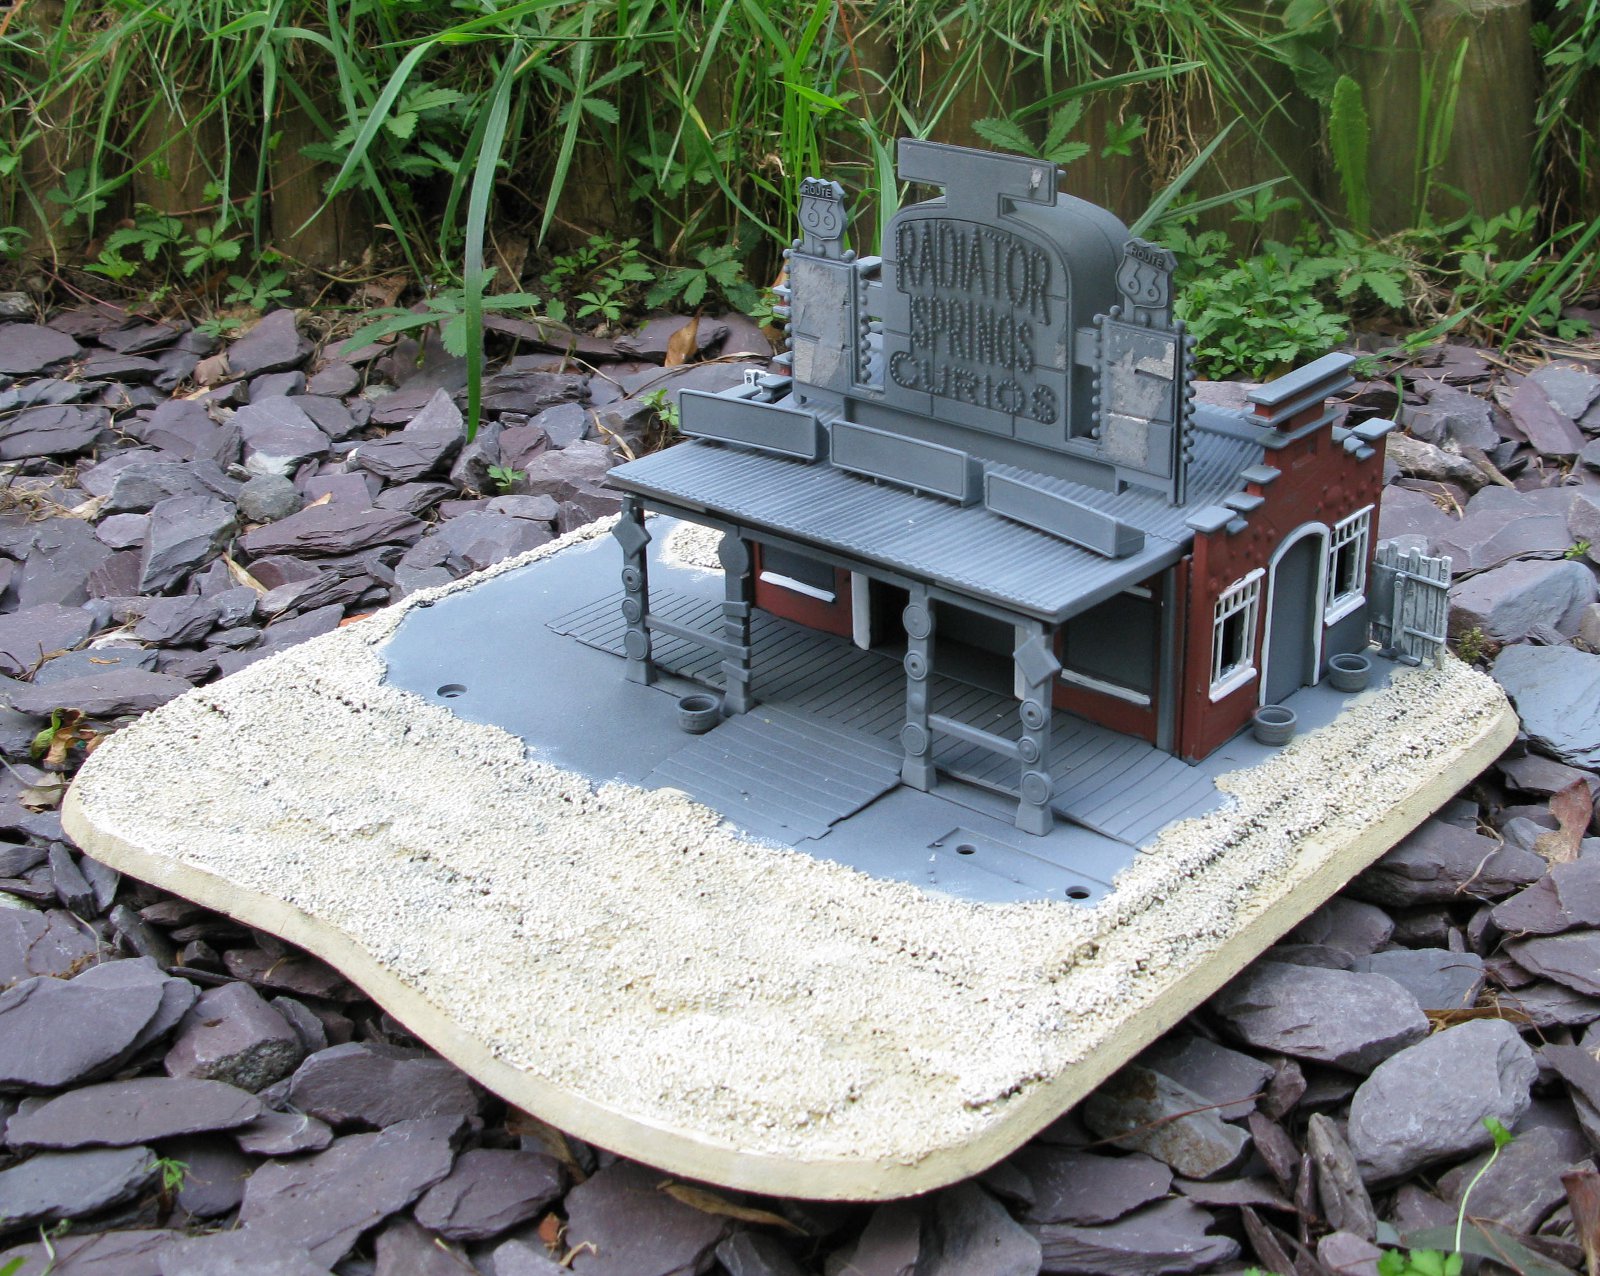
I was wandering round the boot sale, early on Bank Holiday Monday, and I happened to find a couple of bits from the 'Cars' movie of a few years back. Basically, two Happy Meal promotional cars and a curio shop. Of course, I carry a 28mm figure in my pocket when I go to these sort of things (doesn't everyone?), so a quick comparison later I was shelling out two quid for these bits of plastic.
They could be the basis of something like a cross between Fallout, Gamma World and Paranoia...
I'm thinking about whether the Warhammer Historical 'Legends of the Old West' rules could be re-skinned to serve as a set of skirmish rules for post-apocalyptic America in the 1950s. Neil from Meeples and Miniatures has suggested Ganesha Games' 'Mutants and Death Ray Guns' as an alternative; I may have to download a copy of that. Of course, GW's 'Necromunda' may do the trick.
So what would I want to cover a 4x4 table? As well as the shop (which is just a re-paint and a base) I want to make a water tower - there's always a water tower, isn't there? - and a house and barn. Then I need some fencing, some trucks and cars (possibly rusted solid, but you can hide behind them) and a billboard advertising whatever film was big in 1952...
And here's the first part of that work - the shop has been based on 6mm MDF, and the step disguised with torn cork tiles. I will be covering it with sand later, then an overall spray of primer and I can start painting...


 |
| GW Imperial Guard for scale... |
I'm thinking about whether the Warhammer Historical 'Legends of the Old West' rules could be re-skinned to serve as a set of skirmish rules for post-apocalyptic America in the 1950s. Neil from Meeples and Miniatures has suggested Ganesha Games' 'Mutants and Death Ray Guns' as an alternative; I may have to download a copy of that. Of course, GW's 'Necromunda' may do the trick.
So what would I want to cover a 4x4 table? As well as the shop (which is just a re-paint and a base) I want to make a water tower - there's always a water tower, isn't there? - and a house and barn. Then I need some fencing, some trucks and cars (possibly rusted solid, but you can hide behind them) and a billboard advertising whatever film was big in 1952...
And here's the first part of that work - the shop has been based on 6mm MDF, and the step disguised with torn cork tiles. I will be covering it with sand later, then an overall spray of primer and I can start painting...

And a quick spray of black primer, an overspray of grey, and it's ready for painting. Unfortunately I flipped the top section against the newspaper while it was wet, so I need to tidy up the advertising panels, but it's looking good so far.

Wednesday, April 06, 2011
Terrain in a box
Last night I was browsing through various blogs and I happened to see the pictures of the tables from Adepticon. One of my dreams is to have a 'table in a box' setup, where I can simply carry a plastic crate into the club, open it up, and pull out everything I need to populate a table - cloth, area terrain and scatter. Looking at these tables, that's pretty much what Adepticon have done.
Every table has six pieces of terrain - typically one or two buildings, two or three hills and two pieces of area terrain (such as woods, pillars or rocks). To that, I would add a selection of scatter - a mix of linear terrain such as walls or fences, craters and what-have-you. What I do like is that the area terrain has defined spots for the trees and whatever to sit in, and these are generically based on what looks like 60mm round bases. If I make the area terrain out of 3mm MDF, and glue a second layer of 2mm MDF on the top, with 65mm holes cut into it, that will give me good solid terrain, with removable features.
So... the next painting competition at the club (in May) is 'Terrain'. I reckon I can knock together a complete set for that if I make the effort. I think I will go for an ice and snow theme, for my Space Wolves, which means a white 6'x4' cloth, three white hills, two white areas with evergreen trees and a bunker. Add to that some linear pieces - maybe some of those barricades from the Aegis lines - and I'm sorted. Who knows, they may even be ready for my first game in the 40k tournament...
 |
| Picture stolen from TheBack40k.blogspot.com |
Every table has six pieces of terrain - typically one or two buildings, two or three hills and two pieces of area terrain (such as woods, pillars or rocks). To that, I would add a selection of scatter - a mix of linear terrain such as walls or fences, craters and what-have-you. What I do like is that the area terrain has defined spots for the trees and whatever to sit in, and these are generically based on what looks like 60mm round bases. If I make the area terrain out of 3mm MDF, and glue a second layer of 2mm MDF on the top, with 65mm holes cut into it, that will give me good solid terrain, with removable features.
So... the next painting competition at the club (in May) is 'Terrain'. I reckon I can knock together a complete set for that if I make the effort. I think I will go for an ice and snow theme, for my Space Wolves, which means a white 6'x4' cloth, three white hills, two white areas with evergreen trees and a bunker. Add to that some linear pieces - maybe some of those barricades from the Aegis lines - and I'm sorted. Who knows, they may even be ready for my first game in the 40k tournament...
Wednesday, June 02, 2010
Laying down the groundwork


Well, it's been a while, but the Bank Holiday weekend has given me a chance to make a mat to go under those buildings, as well as doing a bit of real-scale gardening. The mat is from Antenociti, the layout is drawn out with masking tape.
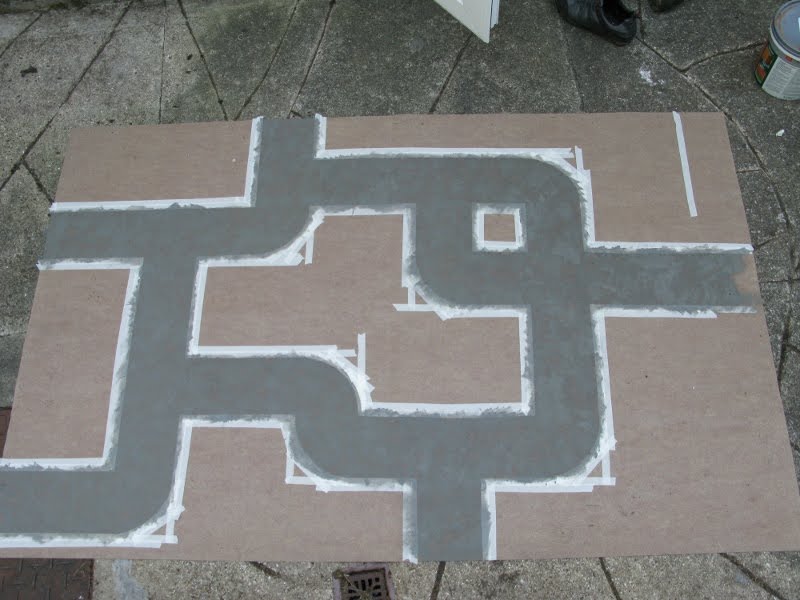
Then I painted it in with household emulsion paint and a sponge - I still need to add white lines to the road, but I haven't decided on left- or right-hand driving yet.

Finally, cut to size (6'x4'), add terrain, and play. The barricades go across roads at an angle, the buildings fit into the grid, and things like the craters drop over the top of everything. I will grab a couple of brown spray-cans and messy-up the surface from a distance once the lines are on, and that should be it.
I reckon I still need another two 6"x12" ruins, and probably a 6"x6" tower to go in the eye of the roundabout. Overall this was cheap, easy and quick... ticks all my boxes!
Saturday, March 13, 2010
And back to the buildings.
 The 6x12 buildings are painted now, and so are some barricades - everything still needs an ink wash and matt varnish, and the barricades need shading and drybrushing as well.
Thursday, March 11, 2010
More with that hill
 I took this picture halfway through planting the flower beds, so you can see what's going on under the plants. Since the last picture, I have built little retaining walls from 5mm foamcore, filled the beds with some scrap polystyrene foam, and punched holes into it with an apple corer. Two coats of black acrylic, then a heavy drybrush of my ground colour to bring out the tiles.
 The plants are from an aquarium plant ball, and they pop off on little cores that fit those holes. A bit of hot glue, and we're away. I think this looks quite decent, and it certainly fits with the 'Imperial Urban' theme I've got going on here. So. Happy :)
Saturday, March 06, 2010
A hill, by any other name... part 2
 Update - I spent a good hour sticking paving slabs down. I printed up a 1cm square grid onto thin card, and cut out loads of 2x2 and 2x1 pieces. Stuck down with white glue, they are what I'm using around all my building bases to bring them together in style. Next will be building the low walls and the flower beds...
A hill, by any other name...


I was trying to think of what I could make that would be like a hill, but more, well, urban. And this is what I came up with. When it's finished, it will have paving all over it, and flower beds in all four corners - like the second drawing on the second photo (apologies for the drawing, there's a good reason why I'm not a graphic artist)
Subscribe to:
Posts (Atom)