Friday, December 31, 2010

Alas, poor Rhino

How many ways can you mis-construct a Rhino? I think the guy who made this considered the instructions to be a threat to his creativity...

I guess I can't complain too much because I picked this one up on Ebay for a few quid, but the list includes doors and hatches fitted inside out, sprue left attached to parts so the hull roof didn't fit, tracks put on wrongly, and one track unit fitted at about 10° to the hull. I thought about turning it into a terrain piece, but eventually decided to try to rescue it.

Given the amount of chopping I had to do (including a quarter of the hull floor to bring the sides back square), I decided I might as well go a step further and convert it to a Mk I Rhino, complete with round side doors and a flat front with twin panels. So here is the 'after bringing back to square but before changing the doors' picture - more to follow over the next couple of days.


And a little later in the day... 

I have removed and replaced the upper doors with a plain version, similar to that on the first Rhino kit, complete with handles from plastic rod. I am considering whether to build a 'climbing frame' in the style of the original.


I have also made blanking plates for the hull sides; they're just propped in place at the moment. I visited WHSmiths for a pair of compasses this afternoon, so I can cut round doors as well. I am considering whether it's worth making just one plate with doors and hinges, and then casting several from resin. If anyone is interested, let me know and we could share costs.

Sunday, December 19, 2010

South London Warlords

Pimping my own site - how low can I stoop?

I have started up a blog for the South London Warlords, a wargames club based in Dulwich.


I will be trying to get an update in place every week from the new year, and more frequently in the immediate run up to and aftermath of Salute, our annual show at the ExCeL Centre. The 2011 show is on Saturday 16th April from 10:00 - 17:00.

Monday, December 06, 2010

The dreadnought we all forgot

Okay, maybe we didn't forget it, maybe we just took a look and thought 'why?'

Anyway, I was putting together my rifleman dread (standard routine - Aegis Line autocannons, missile launcher and twin-linked lascannon arms) and I cut the lascannon mount too short. You have to cut the lascannon barrels off on the outside of the recuperator section rather than flush with the armour otherwise the autocannon barrels don't stick out the same distance as the ones you fit on the missile luncher arm. Luckily I have plenty of spare dreadnought arms.

That left me with a useless armoured shoulder, and I was about to throw it when I remembered the twin-linked heavy flamer option! The weapons were easy to source (there's a heavy flamer in every dreadnought kit) but it still looked a bit sparse. Then I found the heavy flamer in the sentinel kit, which is quite a bit longer... and Bob's your uncle. A little clipping, a small piece of plastic card, and 'jobs a goodun'


Okay, it's 'triplet-linked' rather than 'twin-linked', but the extra bulk makes it look better. I can't see that I'll ever use it, but at least I have the missing variant in the armoury now.

Comments very welcome...


8755

Sunday, November 21, 2010

A productive day

Yesterday was a productive day. Not only did I paper the living room, I also got some paint on the Hunters while my better half was watching Strictly Come Dancing and the X-Factor. And I finished in time to see the last part of Pillars of the Earth, too.


They are nothing special, but they just need basing and sealing and they'll be ready for use. My target here is to get 250 points playable per month, and to be ready to play a 1500 point army by next summer. That should be 2000 points painted, which will give me some choice.

Comments very welcome.


8314

Monday, November 08, 2010

Space Wolf painting... under way

I managed to grab a couple of hours the other evening, so the basic armour colour is in place. GW Astronomicon Grey with a Devlan Mud wash over the top. The target is tabletop quality at a reasonable speed, and since I get about an evening a week to model, this is my method. 


Next will be the pack markings and the details - all those wolf teeth and claws.

Tuesday, November 02, 2010

What happens when you cross...

...a Basilisk with a Leman Russ?

This is the first of my two artillery pieces; I have combined the hull from the Basilisk with the track units from the Leman Russ. I was looking for something a little different, and with Bits and Kits selling the tracks for £2.50 each, this was fairly cheap. I will find a use for the Basilisk track units somewhere, I'm sure.


Quick and easy, and it looks a bit heavier than the standard Basilisk without being so different as to confuse my opponent.

8068

Monday, November 01, 2010

Starting a new army

I feel in need of a new army. My Imperial Guard have ground to a halt, as I wait for Wargames Factory to put out the heavy weapons, and although I have a couple of Earthshakers under way, I feel like a change. I was browsing the lead-and-plastic mountain and I found a few of the old 13th Company Wulfen dating back to the old Eye of Terror codex, so I have decided to use them as the starting point for a Space Wolves list. I guess most people know the figures I mean, but they are partially equipped with chaos armour torn from the bodies of their victims on the great hunt through the Eye of Terror. I like that idea, but I want to bring it up to 999.M41 rather than being the remnants of a Heresy force.

So, after a quick browse through the codex, I found this...


Bran Redmaw's Company
Bran Redmaw, whose personal icon is the Bloodied Hunter, likes nothing more than to hunt under the full moon. Bran is instinctively cunning, able to second-guess his enemies and ensure that his Grey Hunters lie in wait for the enemy after the fury of his front line forces them to retreat. The savagery of his company is legend - an enemy force trapped by Bran's Great Company will quite literally be torn to pieces.

The sign of the Bloodied Hunter is associated with those with the Mark of the Wulfen, and indeed there are many in Bran's Great Company who bear that particular curse - some even whisper that Bran has been seen to take on a different form when caught up in the hunt.


So here is the basis of my force. Bran believes that the end-time is coming. He believes that the momentary reappearance of the legendary Thirteenth Company during the last Black Crusade presages greater things. And he believes that his wolves must prepare for those days - those wonderful, terrible days - when Russ will walk amongst us again.

With this thought, he has sent out his Great Company to hunt the traitor once again. They are to hunt wherever the trail leads them, to supply themselves from the enemy, and to return to the Fang when the Wolf Time comes, stronger and faster, to stand beside Russ.


 The pack has a powerfist, a banner, two meltaguns, five hunters with basic weapons and, of course, the wulfen. Mostly made from the Space Wolf plastic kit, with odd bits added from the berzerker kit and from the spares box.

The rhino is pretty standard, though I have managed to use the hatch elsewhere so I had to use one of the resin spares I cast up for my Imperial Guard tanks in place of the usual one. Still, that's in keeping with the 'make do and mend' attitude of this army. The icon on the front of the rhino is from the backpack standard in the kit, sanded flat on the back and trimmed to fit the space on the front of the hull.

More to follow. I am intending to get 200+ points per month painted, which should give me a 1500 point army by Easter. Maybe. Watch this space :)

Saturday, October 16, 2010

SELWG tomorrow

Sunday is the SELWG show - http://www.selwg.com/selwg05.html - and I have a little cash to spend this time thanks to Ebay. I think I'll be looking for cases from Kaiser Rushforth and some hills and rivers.

It's been a busy few weeks, but hopefully I can get back to doing something with the hobby...

Saturday, September 11, 2010

A tale of two pigments

In the end I didn't paint a squad in a mix of paints. Instead, I painted two squads, one in hobby paint and one in craft paints. The comparisons in colour between the pots and tubes were close, but different enough that they would look odd in the same squad.


For the basic coats I used GW Foundation Tausept Ochre and Folkart Yellow Ochre - quite different in level of pigment, and it took two coats of Folkart where I only needed a single coat of GW over black primer. Probably not a fair comparison since that's the whole point of the foundation paints... so let me ignore that one.

The other colours were a fairer comparison. My biggest complaint is the texture of the craft paints. The actual pigment levels were very similar between the two types of paint directly from the pot/tube, but the consistency of the craft paints was rather glutinous. In some of the colours, it was as though the manufacturer had sneezed repeatedly into the mix; the consistency  was almost like white (PVA) glue.

What this meant was that I needed much more thinning to make the hobby paints workable, which obviously reduced the opacity and then led to my needing two coats of most colours to get an even coverage (honourable mention for gray here).

Overall, I have seen enough to prove to myself that hobby paints are better than craft paints for the way that I paint. Craft paints may work for you, and the end results are decent enough, but I will go back to hobby paints from now on.

Oh - and if you're wondering, the upper picture is craft paints and the lower picture is my usual hobby paints...

Monday, August 30, 2010

The seven 'P's

I am away from home on a course starting on Thursday next week, nine days including the weekend, so I will be pretty much incommunicado. I'm building up a block of troops to take with me for the week, and I reckon an hour an evening should see me through them all in that time.


So what have I got?

  • Two squads of Wargames Factory Shocktroopers (EY2 and EY3); a total of sixteen lasguns and a couple of grenade launchers to go with the sergeants I painted a couple of weeks ago. Only one in the image above; the other squad was hiding somewhere... 
  • A veteran squad of Games Workshop Cadians (V08) with Pig Iron packs and heads; a sergeant, three grenade launchers and six lasguns, and also a missile launcher stand.
  • Two more veterans (V03) to allow me to swap the heavy bolter out of the previous squad.
The interesting bits are the missile launchers (two to a base; I want them for Kill Team, and they have the 'relentless' USR, which I reckon can be represented by extra missile tubes) and the sergeant, who has an Empire torso to replace the Cadian one.


I also played around to make cheap plasma guns for the next veteran squad; this is made from a bolter and a plasma pistol. [edit] And here is the original source of this conversion - thanks 'Other Kevin'. [/edit] Looks pretty good to me; I just need to wait for my next delivery of Pig Iron heads and some more backpacks before I do the rest of the squad. The only unfortunate thing is that you have to use the lasgun arms where the left hand is on the arm and not the gun, so you only get two suitable pairs per box; still, it's not as if I'm short of arms...


Oh yes - the seven 'P's - Proper Prior Preparation Prevents Pi$$ Poor Performance.

Wednesday, August 25, 2010

The quality of paint is not strained...

I was listening to one of my regular diet of podcasts in the car the other day (Meeples and Miniatures, episode 65 - http://meeples.wordpress.com/) where Neil was talking about painting figures. There was a discussion about paint and preparation, and one of the comments was that neither he nor his co-presenter would ever use craft paint other than for scenery.

Which got me to thinking... it may not be as good as hobby acrylics (GW, Vallejo, PP, Foundry or whatever), but is it 'good enough' for rank and file? I have certainly used odd colours in the past, and I will admit that I still use craft acrylics to touch up spray undercoats where the can misses undercuts. So I dropped into Hobbycraft on the way home from the office and I picked up five tubes of FolkArt acrylic (http://direct.hobbycraft.co.uk/productdetail.asp?productcatalogue=246194) which were as close as I could match by memory to the colours I'm using for my Imperial Guard.

What I will do is to assemble and undercoat my next squad as usual (a veteran squad of GW Cadians with Pig Iron heads and backpacks) and then paint five using my usual paints and five using the cheap craft paints. Both batches will get a Devlan Mud wash, and then I'll see whether I can tell the difference. And I'll post the pictures so you can compare them too.

Thursday, August 19, 2010

Painted command squad

I'm off work this week, and I got a chance for some painting this afternoon.

Grenadiers for the platoon command squad - Echo Yellow Zero.

And the platoon commanders, along with the squad sergeants for EY2 and EY3.

And last of all, the first figure for my company command alongside the EY0 grenadiers for scale; this is the Master of Ordnance. Arms from the tank commander, torso and shoulder pads from a Cadian, head from Pig Iron, 'legs' from a BBC dalek...

I really must get some basing done soon!

Wednesday, August 18, 2010

Once you've gone plac...

...you won't go back!

Sorry, bad pun.

We are having a 'Kill Team' tournament at the South London Warlords after the summer break, and I thought I would quickly knock together a rather more elite team than I usually go with - a squad of 8 Sternguard. I'm not sure how well they will work, but the mix of ammo types is quite fun, and there's only a few figures to paint.

Anyway, I dug out a couple of boxes from the lead mountain - Veterans and Sternguard - and started to put a squad together. My word, how frustrating! I have been working with plastic for ages, and going back to metal was a real eye-opener. All those little tendrils from the air-bleed points, mould lines that need files, superglue/greenstuff sandwiches to assemble the parts... give me plastic every time.

In the end, I got three figures made. I'm going to go buy some of the new armour variants from Forgeworld, and make the rest of the squad from those; at least resin is easy to cut and clean up!

So, rant over. I have set up a little poll; please vote so I know it's not just me!

Friday, August 06, 2010

Shocktroop platoon command

Well, I thought I would use the remaining figures from the first box while I waited for Wayland Games to get stock and deliver the other three. Eight figures - what to do, with not quite enough for another infantry squad. So I decided to do the Platoon Command Squad - grenade launcher spam and a couple of choices for the platoon commander - and the sergeants for the other infantry squads.


First of all, the grenade launchers. I played about to try to get a better angle on the gun, and I am pleased to say that after a bit of practice, there's some leeway in the pose. Anyway, the squad grunts are done.


Next up are the officers and NCOs. These are the guys I was more worried about; the box parts aren't all that great for command figures. Still, I'm quite happy with what has come out.

I really raided the bits box for them; there are some old bits in there that you're unlikely to be able to source easily these days. The sergeants are the guys on the ends, and they have laspistols from the old GW generic close combat sprue. The platoon commander's power fist comes from the same place (still needs a bit of green-stuff to blend it in). The plasma pistol and bolt pistol on the two platoon commanders, and the sergeants' chainswords, are the old GW assault marine parts - they still have the marine hands attached to the weapons in most cases, trimmed down to visually match the shocktroop wrists. The chainsword on the platoon commander third from left is from the GW Cadians, again with the hand still attached.

Most of the left arms are made from the arm that cradles the lasgun; cut across the bicep and rotated to move them away from the body, and cut at the wrist to replace the hand with a weapon hand. Right arms are mostly the flamer arm; it's at a decent angle, though the hand has a non-standard grip on the weapon so it has to be replaced.

That's a platoon command squad, a spare platoon commander, plus a couple of sergeants for the next two infantry squads. I reckoned these were going to be the most awkward to do, so I thought I'd get them out of the way while I had some time. Overall - colour me happy.


Saturday, July 31, 2010

Stormtroops and Shock Troops - a comparison

I have now assembled the first few figures from the Wargames Factory Shocktroops box. As I said in a previous post, I intend to use them for an Imperial Guard army for 40k, so they're being assembled to fit that system. For the first lot, I have stuck (almost) exactly to what is in the box - here are ten troopers, with a sergeant, a special weapon (grenade launcher) and eight lasguns. Once the heavy weapons are released, I will drop two lasgunners from the squad and draft in an autocannon proxy, which is why there are two guys without squad markings. From my four boxes, I will get six squads initially (Echo Yellow 1-3, Echo Red 1-3); once the heavies come out I will be able to spread out into another two squads (Echo Yellow 4, Echo Red 4).


Plus points:
The figures are in general nicely sculpted, the coats seem to flow well, the shoulder pads are distinctive without being intrusive. There are enough of the standard weapon to arm every figure; it's is a nice looking gun which is very much equivalent in length and bulk to the GW offering. There are five other gun options; three are similar to the lasgun in style and could be used to kit-bash other weapon types by combining them with GW parts. There is also a grenade launcher (which looks nice) and a flamer (which I'm not so keen on) so plenty of options for the standard troopers. There are a couple of water bottles and knives; I would have preferred one more of each, so every man got one, but nice nevertheless. There are enough spare powerpacks for every figure to get at least one hung from their belt, which is good.

Minus points:
The left hand is at the wrong angle. If you assemble the figures exactly as they come, the thumb is too high and the heel of the hand is too low. I have started amputating at the wrist and rotating it about 15° so that the gun sits neatly in the hand.
The command options are very weak - the only options are a pistol-packing right hand and a pointing left hand. The pistol is a real pea-shooter of a weapon, and this was the one adddition I made to the figures I assembled, exchanging it for a lasgun from the GW Cadians. If you assemble the pieces exactly as they come in the kit, it makes the command figure look very peculiar. This is a multi-part plastic kit, yet the only command figure you can make is completely two-dimensional. I have put one together for this blog entry, but it will be the only one to look like that - I will be drafting some Cadian parts in for the others.
The necks are too long. They are giraffe-necked if you assemble them directly from the sprue; I chopped back the length of the neck by somewhere between 1 and 1.5 millimetres (which may not sound like much, but in scale that's perhaps 3" out of the neck!) On the plus side, it's far easier than doing that with metal, and you quite quickly learn where to cut rather than having to offer the head up to the body each time. Another option would be to spin a 1/8" drill bit in the neck socket, which might be quicker; I will try that on the next unit.

I'm reading back, and I think I am coming over very negative. I don't want to, and I don't mean to. They are nice figures with a few small problems which are pretty easy to overcome or ignore. And at the price, they are hard to beat. Anyway, I have enough for two 35-man Imperial Guard platoons for under £50; that's pretty good going. I will almost certainly buy some more when I have assembled all of these, which is surely the acid test of a model.

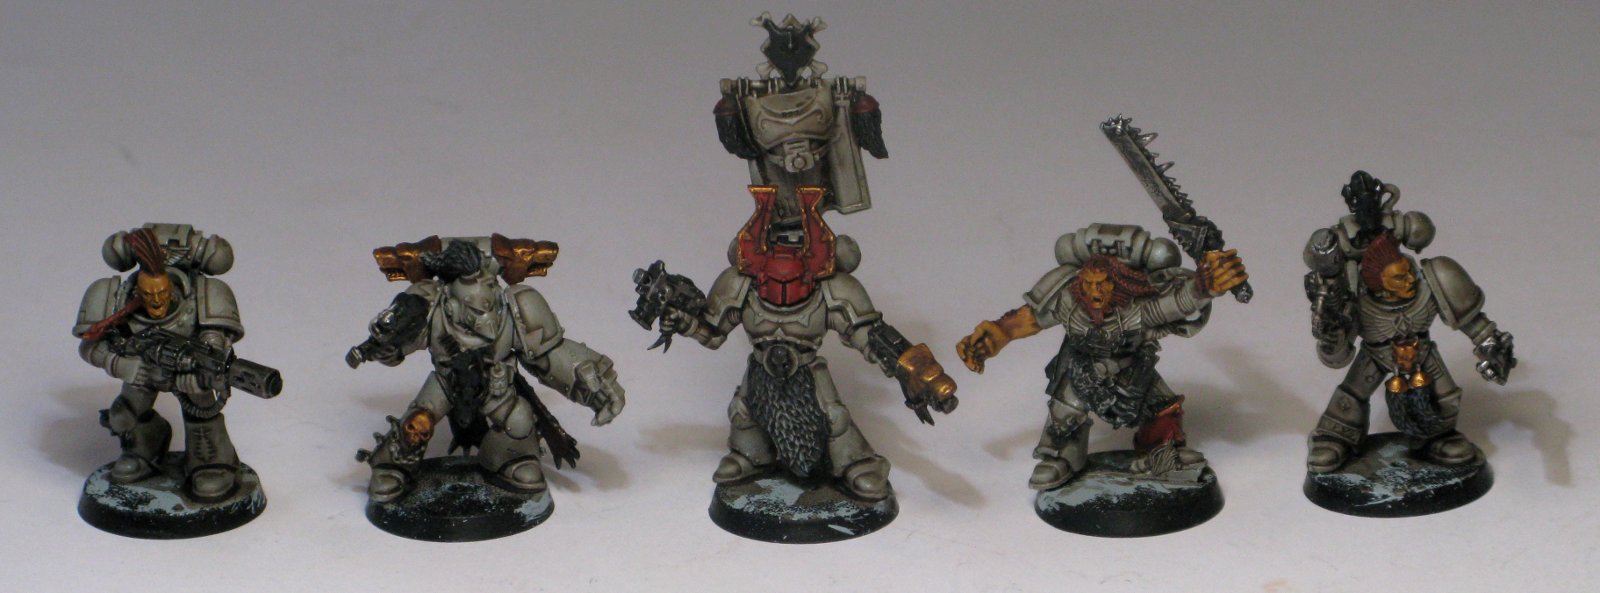
And finally - the painted veteran squad, and a comparison between the GW Cadian Shock Troops and the WF Stormtroops - I think it shows that they can happily be used together.


Tuesday, July 27, 2010

Greatcoats have arrived!

The first box of Wargames Factory greatcoat troops arrived from the States this morning; they were sat on my chair in the living room when I got in from work a few minutes ago. This is written from the point of view of a 40k player who wants to use them to bulk out his Imperial Guard; I will be using GW Cadians for Veterans, and the WF Shock Troops as basic infantry, as they're about half the price.

First impressions. Nice mouldings, very compatible 'size wise' with their GW compatriots. The basic gun and grenade launcher are closely comparable in length and bulk to the GW equivalents. The heads are nicely moulded, and there are plenty of choices. On the downside, the flamer is very weedy; however, there are three extra lasgun variants that could be easily cut-and-shut into a plasma gun or a bulkier flamer using the spares from my Cadians.

The basic box comes with 18 figures for US$20, which feels about right. You can get them for £14.50 from Wayland Games; I have a pre-order of another 3 boxes coming at a fairly decent discount which will give me a total of 72 guys which is plenty for a couple of troops choices. They don't have heavy weapons (yet) which is the only downside, but they are in the advanced planning stage.

One final comment, and this is more cosmetic than anything. You know how you open a GW box, and it feels as though it's been packed with goodness? Well, these feel the opposite. The sprues are small, the box is tall, and you could very easily have fitted another two, maybe even four, sprues into the box. No reflection on the quality of the product, but it feels like it could have used a slimmer box and thus saved packaging cost, transport volume, and felt like better value too.

I will hopefully build some this week; pictures to come.

Monday, July 26, 2010

Veterans under construction


It's been an odd week or so, but I have managed to get the first of my veteran squads constructed. They're made from GW Cadians, with heads and backpacks from Pig Iron. The heads fit pretty well, though I have drilled and pinned them to the bodies. The packs were a bit more awkward - I trimmed the little block off the back of the Cadians' torso, and joined the pieces together with a superglue-greenstuff-superglue sandwich. Seems pretty solid. I'm still not 100% happy with the heavy bolter loader's left arm; it may be removed and replaced. Still, that's one half of my Kill Team for the club tournament starting in September.


I also finished the hack-job on their Chimera; I have moved the turret backwards about an inch. Which left me with a hole where a hatch should go; I looked through the bits box, but I seem to be pretty much out. I have been using my spares on the KV2/Ragnarok tanks, which has left me short. Okay, we can fix this; one RTV rubber mould made, several grams of resin mixed, one never-ending supply of hatches created. It's pretty indistinguishable once you have primed the lot, which is the stage I have reached now.


I have also started to put together another building - this is the 'Bell Tower of Lost Souls' - I have still got to add a bell, but you get the idea. This time it's a 6"x6" base; if you look back through the blog to find my terrain mat, you can see where it's intended to go. The pencilling on the base is to let me line up the paving slabs, which is the next job.


And finally, a Land Raider I've been playing with for a while. It was an Ebay purchase, very cheap (about £8 including p&p), and came with quite a mess in places, especially the sides. I constructed coffin sponsons from plastic card and attached what was left of the lascannons to them; it's not perfect but it's more acceptable than it was. I still need to paint the heraldry - a big Dark Angel winged sword across the hull, and the symbols on the sponsons - but it's basically there.

Oh yes, my Chaos are a Fallen army - I started painting DAs under Rogue Trader when they were black, and when I got back into the game, I just stuck with it.

Not a bad haul for a week and a half, really...

Thursday, July 15, 2010

Wildebeest completed


Woo hoo! I managed to get the paints out last night after work, and this is the result. Wheels by Brigade Models, machineguns by Battlefront, hull by me!

Again, painted sand and granite, washed with devlan mud, drybrushed sand. Quick and easy, and I'm really pleased with the way they have turned out; I have another four assembled waiting for their paint jobs; I am tempted to give one of them a searchlight rather than a machine gun and make an ambulance. Then I must get on with the job of making some turrets to create an IFV version.

I know that they have cost me far more than I would have paid to buy four APCs from a 'real' manufacturer, but I am so pleased to have my own unique models that I don't care. There's something really satisfying about working through a model from start to finish.

Change the past, change the far future

Just a quick note - the Bolter and Chainsword forum site has produced an interesting 'Alternative History' version of the heresy; one in which Rogal Dorn rather than Horus leads the rebellion.

Very interesting, really nicely written, and it makes me want to add at least a squad of Khorne Space Wolves to my chaos army...

http://www.bolterandchainsword.com/index.php?showtopic=200543

Wednesday, July 07, 2010

Never give up...

I played another couple of games of the 40k Kill Team (40KT from now on) mission on Monday night. One that has stuck in my mind was a game of my Daemons against Mike's Orks. Orks are a really tough army in 40KT; not only can they take masses of figures to bump up their breakpoint, but they can take heavy weapon squads (Lootas) as well. Anyway, Mike's list was something like ten grots and a runtherd, ten orks, four lootas - it was certainly 25 figures, so he needed to lose 13 before he started taking leadership tests. My list comprised five bloodletters and seven horrors, so I would be taking tests after losing six.

Things started badly, I lost a couple of horrors very quickly, and I was down to seven figures before I had closed for combat. Horrors can shoot, but their ballistic skill isn't very high, and the cover saves were costing me kills. Anyway, I got into combat and started to do some damage, but not being able to consolidate into combat is painful and leaves you exposed to massed firing.

To cut a long story short, and to finally get to the point, I was down to a single horror, backing off and throwing out shots at the orks. I had just taken my 4th leadership test (at a -3, no less) when I managed to kill another grot to bring Mike down to twelve figures remaining. Of course, Mike failed his leadership test straight away, and I won the game... despite me having only one model on the table, and him having as many models left as I started the game with!

And the moral of this story? Never give up, and always keep your eye on the objective. Mike could have easily won the game by dropping back out of range and letting the leadership tests take me out of the game. Instead he kept pushing forward, allowing me to target his grots and eventually fluke a win.

We have been enjoying 40KT, to the extent that we are going to have a tournament after the summer; everyone submits two lists (though I think there were going to be some additional restrictions on vehicles and monstrous creatures) and plays all the other players...

Tuesday, June 29, 2010

Twenty-six grams

Well, this resin casting lark is a piece of cake - I can't see what I was ever worried about. ;)

I have started casting myself some of the APCs, but first things first. I was as careful as I could be while I removed the master from the mould, but I still managed to tear a small section. I think there was a fine gap between the hull and the plastic card base, and this allowed a small amount of rubber to get into that space. When I lifted the master out, it tore a tiny section of the mould out as well, so one of the axle stubs has a flaw beside it - indicated by the knife-blade.


Anyway, I cleaned up the mould, removing the wax and generally tidying up the edges, and then I tried a casting.

I measured the size of the void I wanted to fill, and I mixed up a little resin. A very little resin. Twenty-two grams of resin, to be precise. Fortunately I went and got a set of electronic scales from Tesco at the weekend, so I can get this accurately mixed up. I mixed, I poured, I realised that twenty-two grams may be precise, but it's precisely wrong. It's slightly shallow, but probably usable... or maybe I'll just keep it for posterity.


Anyway, since then I have cast another four APCs; twenty-six grams of resin is the correct amount to fill the mould and have just enough resin left over to make the hatch. It takes about 15-20 minutes to mix and pour the resin, wait for it to bloom and cool, remove it from the mould and clean up for another run. Not bad... and they are all small and solid enough that I don't have any problems with warping and flexing.

Final stage - attach some wheels to the hulls...


I have to say that I'm well chuffed with the way this has come out.

Sunday, June 27, 2010

Making the mould...


And this is where it gets scary - making a mould from my lovingly-crafted master. I have stuck the masters to a piece of plastic card; my assumption is that I want a flat surface so that when I have poured the resin, I can run a blade across the top while it's still wet to ensure I have a flat bottom and minimal sanding after removal. I hope.


I popped the plastic card into a lego frame, and filled the gaps around the edge with wax. Then sprayed with mould release.


And mix and pour the RTV101 rubber from Tiranti. I am slightly worried about the number of bubbles surfacing, but I have knocked, tapped and jogged it as much as I can to try to get them all to surface. I will pop it out of the mould tomorrow... watch this space :)

Thursday, June 24, 2010

Back to the 15s


As I said a couple of posts ago, I have an awful lot of spare wheels for my 15mm APCs. Well, here is the initial work on the hull; created from a cut-down Rhino, with the detail all removed and sanded back to a block of resin. Everything has been added with plastic rod, tube and sheets except the stowage boxes, which are the originals, removed with a razor saw and turned sideways. I still need to make a turret and a hatch for the top of the hull so that it can be an APC or an IFV.

I would say there's another evening's work in making the master with some greenstuff to fill gaps, then I can have a go at making an RTV mould and doing some resin casting - not something I have ever tried before, so wish me luck!

Update:


Here are some comparison pictures between Brigade Model's 6mm version of the Wildebeest and my 15mm version. The hatch is made from plastic card and tube and a KV2 return roller for the hatch doors themselves; the wheels just press-fitted onto the axle stubs. Though I say it myself, it's looking pretty good. Next I have to make the alternative turret...